
개발자툴 여는 법 (크롬 브라우저)
1. 웹사이트에서 마우스 오른쪽 클릭
2. 맨 마지막에 있는 inspect 또는 검사 클릭
아이콘
fontawsome 웹사이트 : https://fontawesome.com/
Font Awesome
The internet's icon library + toolkit. Used by millions of designers, devs, & content creators. Open-source. Always free. Always awesome.
fontawesome.com
CDN (Content Delivery Network) 이란?
웹 페이지, 이미지, 비디오 등의 콘텐츠를 사용자의 물리적 위치와 가까운 프록시 서버에 캐싱한다.
이렇게 하면 콘텐츠가 로딩될 때까지 기다릴 필요 없이 영화 감상, 소프트웨어 다운로드, 은행 잔고 확인, 소셜 미디어 포스팅, 구매 등의 작업을 할 수 있다.
즉, CDN을 통해 다른 사람이 만든 스타일 등을 가져오는 것이다.
사이트에서 CDN 링크를 받은 후, <head> 태그 안에 첨부한다.
<span> : 그룹은 나누어 주되 다른 기능은 없음. 줄바꿈 x
.nav-item{text-decoration: none;} : a href 의 밑줄 없애기
.navbar{border:1px solid red;} : <div> 태그로 나눈 영역들을 빨간 박스를 생성해 구분해서 표시하기 (다 만든 후 지워주기) 일종에 설계도 느낌으로 많이 쓴다
.nav-item:hover {text-decoration: underline;} : .nav-item이라는 스타일을 가진 html 태그에 hover (= mouse over) 라는 이벤트가 생기면 text-decoration: underline; 을 실행시켜라
.navbar{float:right;} : 오른쪽으로 밀기
block : 태그들을 수직으로 배열함
text-align:center : 가운데 정렬
border-radius : 모서리를 둥글게
* padding 에는 1개,2개, 4개의 값이 들어갈 수 있다
1개 : 네 방향 다 같은 값
2개 : 가로방향(위아래) 세로방향(오른쪽왼쪽)
padding: 10px 20px 30px 40px ---> 첫번째부터 top, left, bottom, right 순서로 공간을 적용함
(헷갈리면 그냥 padding-right / padding-left 으로 작성할것)
position : 요소를 어디에 위치시킬까
absolute : 절대값
relative : 있던 위치 기준으로 움직임
width:100%; : 자신의 부모에 대한 100%
- display : 요소가 어떻게 보여질지를 결정
- border: 1px solid red; - 테두리를 그려준다 (두께, 스타일, 색깔)
- border-radius : 모서리를 둥게함
- width: 넓이 지정
- height: 높이 지정
- position: html태그를 위치시키는 방식 지정 (다음 챕터에서 다룰 예정^^)
- background-color: 배경색
- font-family: 폰트 스타일
- box-shadow: 박스뒤에 그림자
- color: 글씨색 (16진수, rgb, 색깔이름 이렇게 세가지로 표현 가능)
1. 맘에 드는 스타일 발견 selector로 선택
2. 스타일 확인
3. 스타일 복사해 내 코드에서 스타일 이름 만들어서 적용
4. 이름 복사해 html에 적용
5. 확인
구글 웹사이트 만들기
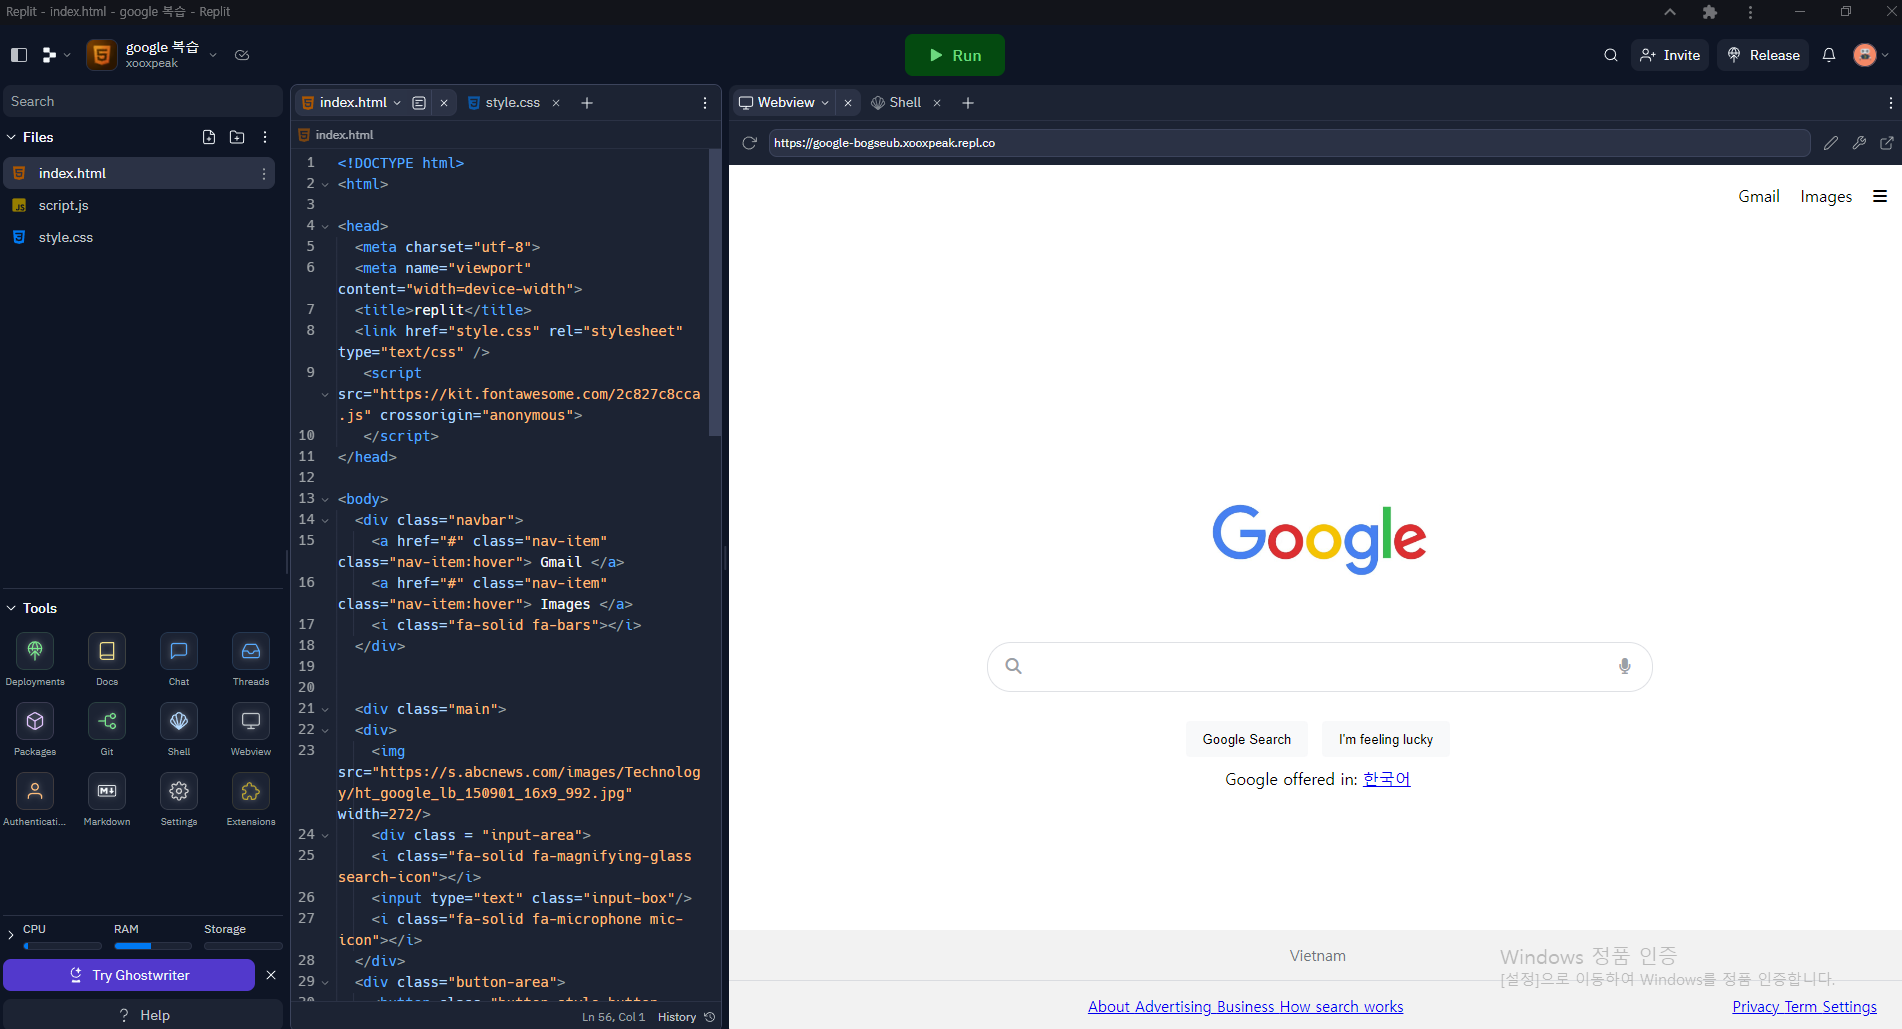
| <!DOCTYPE html> <html> <head> <meta charset="utf-8"> <meta name="viewport" content="width=device-width"> <title>replit</title> <link href="style.css" rel="stylesheet" type="text/css" /> <script src="https://kit.fontawesome.com/2c827c8cca.js" crossorigin="anonymous"> </script> </head> <body> <div class="navbar"> <a href="#" class="nav-item" class="nav-item:hover"> Gmail </a> <a href="#" class="nav-item" class="nav-item:hover"> Images </a> <i class="fa-solid fa-bars"></i> </div> <div class="main"> <div> <img src="https://s.abcnews.com/images/Technology/ht_google_lb_150901_16x9_992.jpg" width=272/> <div class = "input-area"> <i class="fa-solid fa-magnifying-glass search-icon"></i> <input type="text" class="input-box"/> <i class="fa-solid fa-microphone mic-icon"></i> </div> <div class="button-area"> <button class="button-style button-style:hover"> Google Search </button> <button class="button-style button-style:hover"> I'm feeling lucky </button> </div> <div> Google offered in: <a href="#"> 한국어 </a> </div> </div> <div class="footer"> <div class="first-line"> Vietnam </div> <div class="second-line"> <span> <a href="#"> About </a> <a href="#"> Advertising </a> <a href="#"> Business </a> <a href="#"> How search works </a> </span> <span class="second-line-second"> <a href="#"> Privacy </a> <a href="#"> Term </a> <a href="#"> Settings </a> </span> </div> </div> </body> </html> |
| html { height: 100%; width: 100%; } body{ display:contents; } .navbar{ float:right; margin:20px; } .nav-item{ text-decoration: none; color:black; margin-right:15px; } .nav-item:hover{ text-decoration:underline; } .main{ margin-top:300px; text-align:center; } .input-area{ margin-top:20px; } .input-box{ width:584px; height:46px; border-radius: 24px; border: 1px solid #dfe1e5; padding-left:40px; padding-right:40px; } .search-icon{ position:relative; left:40px; color:#9aa0a6; } .mic-icon{ position:relative; right:40px; color:#9aa0a6; } .button-area{ padding-top:18px; } .button-style{ height:36px; background-color:#f8f9fa; border:1px solid #f8f9fa; border-radius:4px; font-family: Apple SD Gothic Neo,arial,sans-serif; padding: 0 16px; margin: 11px 4px; } .button-style:hover{ box-shadow: 0 1px 1px rgba(0,0,0,.1); background-color: #f8f9fa; border: 1px solid #dadce0; color: #202124; } .footer{ position:absolute; bottom:0px; background:#f2f2f2; width:100%; } .first-line{ padding: 15px 30px; border-bottom: 1px solid #dadce0; font-size: 15px; color: #70757a; } .second-line{ padding: 15px 30px; font-size: 15px; color: #70757a; } .second-line-second { float:right; } |
쌤 따라서 구글 웹사이트 똑같이 만들기...........우와우
중간에 뭐가 뭔지 왜 안되는지 좀 빡치는 때도 있었지만 오류 알아내서 해결하고 내가 원했던 화면이 뙇! 뜰 때의 기쁨이란...
고작 이거 하고 뿌듯함 맥스 찍는 응애ㅋㅋㅋㅋㅋㅋㅋㅋ
다음 진도 빼는 것보단 천천히 혼자 다시 한번 만들어보며 스타일, 과정에 익숙해지기!!!!!!!!!!!
'Programming Language > HTML & CSS' 카테고리의 다른 글
| [코알누] Chapter 8. 쇼핑몰 웹사이트 만들기 (부트스트랩) (0) | 2023.05.04 |
|---|---|
| [코알누] Bootstrap (0) | 2023.05.03 |
| [코알누] Chapter 6. Spotify 웹사이트 만들기 (0) | 2023.05.03 |
| [코알누]Chapter 5 - html을 좀 더 쉽게 움직이는 방법 (0) | 2023.05.01 |
| [코알누] Chapter 1 ~ 3 (0) | 2023.04.27 |
개발자툴 여는 법 (크롬 브라우저)
1. 웹사이트에서 마우스 오른쪽 클릭
2. 맨 마지막에 있는 inspect 또는 검사 클릭
아이콘
fontawsome 웹사이트 : https://fontawesome.com/
Font Awesome
The internet's icon library + toolkit. Used by millions of designers, devs, & content creators. Open-source. Always free. Always awesome.
fontawesome.com
CDN (Content Delivery Network) 이란?
웹 페이지, 이미지, 비디오 등의 콘텐츠를 사용자의 물리적 위치와 가까운 프록시 서버에 캐싱한다.
이렇게 하면 콘텐츠가 로딩될 때까지 기다릴 필요 없이 영화 감상, 소프트웨어 다운로드, 은행 잔고 확인, 소셜 미디어 포스팅, 구매 등의 작업을 할 수 있다.
즉, CDN을 통해 다른 사람이 만든 스타일 등을 가져오는 것이다.
사이트에서 CDN 링크를 받은 후, <head> 태그 안에 첨부한다.
<span> : 그룹은 나누어 주되 다른 기능은 없음. 줄바꿈 x
.nav-item{text-decoration: none;} : a href 의 밑줄 없애기
.navbar{border:1px solid red;} : <div> 태그로 나눈 영역들을 빨간 박스를 생성해 구분해서 표시하기 (다 만든 후 지워주기) 일종에 설계도 느낌으로 많이 쓴다
.nav-item:hover {text-decoration: underline;} : .nav-item이라는 스타일을 가진 html 태그에 hover (= mouse over) 라는 이벤트가 생기면 text-decoration: underline; 을 실행시켜라
.navbar{float:right;} : 오른쪽으로 밀기
block : 태그들을 수직으로 배열함
text-align:center : 가운데 정렬
border-radius : 모서리를 둥글게
* padding 에는 1개,2개, 4개의 값이 들어갈 수 있다
1개 : 네 방향 다 같은 값
2개 : 가로방향(위아래) 세로방향(오른쪽왼쪽)
padding: 10px 20px 30px 40px ---> 첫번째부터 top, left, bottom, right 순서로 공간을 적용함
(헷갈리면 그냥 padding-right / padding-left 으로 작성할것)
position : 요소를 어디에 위치시킬까
absolute : 절대값
relative : 있던 위치 기준으로 움직임
width:100%; : 자신의 부모에 대한 100%
- display : 요소가 어떻게 보여질지를 결정
- border: 1px solid red; - 테두리를 그려준다 (두께, 스타일, 색깔)
- border-radius : 모서리를 둥게함
- width: 넓이 지정
- height: 높이 지정
- position: html태그를 위치시키는 방식 지정 (다음 챕터에서 다룰 예정^^)
- background-color: 배경색
- font-family: 폰트 스타일
- box-shadow: 박스뒤에 그림자
- color: 글씨색 (16진수, rgb, 색깔이름 이렇게 세가지로 표현 가능)
1. 맘에 드는 스타일 발견 selector로 선택
2. 스타일 확인
3. 스타일 복사해 내 코드에서 스타일 이름 만들어서 적용
4. 이름 복사해 html에 적용
5. 확인
구글 웹사이트 만들기
| <!DOCTYPE html> <html> <head> <meta charset="utf-8"> <meta name="viewport" content="width=device-width"> <title>replit</title> <link href="style.css" rel="stylesheet" type="text/css" /> <script src="https://kit.fontawesome.com/2c827c8cca.js" crossorigin="anonymous"> </script> </head> <body> <div class="navbar"> <a href="#" class="nav-item" class="nav-item:hover"> Gmail </a> <a href="#" class="nav-item" class="nav-item:hover"> Images </a> <i class="fa-solid fa-bars"></i> </div> <div class="main"> <div> <img src="https://s.abcnews.com/images/Technology/ht_google_lb_150901_16x9_992.jpg" width=272/> <div class = "input-area"> <i class="fa-solid fa-magnifying-glass search-icon"></i> <input type="text" class="input-box"/> <i class="fa-solid fa-microphone mic-icon"></i> </div> <div class="button-area"> <button class="button-style button-style:hover"> Google Search </button> <button class="button-style button-style:hover"> I'm feeling lucky </button> </div> <div> Google offered in: <a href="#"> 한국어 </a> </div> </div> <div class="footer"> <div class="first-line"> Vietnam </div> <div class="second-line"> <span> <a href="#"> About </a> <a href="#"> Advertising </a> <a href="#"> Business </a> <a href="#"> How search works </a> </span> <span class="second-line-second"> <a href="#"> Privacy </a> <a href="#"> Term </a> <a href="#"> Settings </a> </span> </div> </div> </body> </html> |
| html { height: 100%; width: 100%; } body{ display:contents; } .navbar{ float:right; margin:20px; } .nav-item{ text-decoration: none; color:black; margin-right:15px; } .nav-item:hover{ text-decoration:underline; } .main{ margin-top:300px; text-align:center; } .input-area{ margin-top:20px; } .input-box{ width:584px; height:46px; border-radius: 24px; border: 1px solid #dfe1e5; padding-left:40px; padding-right:40px; } .search-icon{ position:relative; left:40px; color:#9aa0a6; } .mic-icon{ position:relative; right:40px; color:#9aa0a6; } .button-area{ padding-top:18px; } .button-style{ height:36px; background-color:#f8f9fa; border:1px solid #f8f9fa; border-radius:4px; font-family: Apple SD Gothic Neo,arial,sans-serif; padding: 0 16px; margin: 11px 4px; } .button-style:hover{ box-shadow: 0 1px 1px rgba(0,0,0,.1); background-color: #f8f9fa; border: 1px solid #dadce0; color: #202124; } .footer{ position:absolute; bottom:0px; background:#f2f2f2; width:100%; } .first-line{ padding: 15px 30px; border-bottom: 1px solid #dadce0; font-size: 15px; color: #70757a; } .second-line{ padding: 15px 30px; font-size: 15px; color: #70757a; } .second-line-second { float:right; } |
쌤 따라서 구글 웹사이트 똑같이 만들기...........우와우
중간에 뭐가 뭔지 왜 안되는지 좀 빡치는 때도 있었지만 오류 알아내서 해결하고 내가 원했던 화면이 뙇! 뜰 때의 기쁨이란...
고작 이거 하고 뿌듯함 맥스 찍는 응애ㅋㅋㅋㅋㅋㅋㅋㅋ
다음 진도 빼는 것보단 천천히 혼자 다시 한번 만들어보며 스타일, 과정에 익숙해지기!!!!!!!!!!!
'Programming Language > HTML & CSS' 카테고리의 다른 글
| [코알누] Chapter 8. 쇼핑몰 웹사이트 만들기 (부트스트랩) (0) | 2023.05.04 |
|---|---|
| [코알누] Bootstrap (0) | 2023.05.03 |
| [코알누] Chapter 6. Spotify 웹사이트 만들기 (0) | 2023.05.03 |
| [코알누]Chapter 5 - html을 좀 더 쉽게 움직이는 방법 (0) | 2023.05.01 |
| [코알누] Chapter 1 ~ 3 (0) | 2023.04.27 |